
I played around with several Youtube tutorials and I was looking for a Cthulhu pattern, but I couldn't find one, so I created one myself.


The design is based off this Iron Man one by PG's Loomacy, so if you want to see how most of the looping works in action, go watch the video:
I don't have a video camera and all you'd see if I did was me pinging bands all over the place and swearing, so it's probably better that I do this with images :).
You will need:
- ~200 body colour bands (I used a random selection of turquoise, green and bright green)
- 4 black bands
- 2 red bands
- 1 loom (2 if you are doing the larger wings)
- 1 hook
- something like tooth picks for loop holding - I use the little plastic hooks that come with some packets of loom bands
Arms
 |
| click to enlarge |
For each arm you need 17 bands and you need to make 2.
The loom shown is a Rainbow loom - hence the little red arrow. If you do not have a little red arrow just make sure the openings in your pegs are pointing down.
The loom shown is a Rainbow loom - hence the little red arrow. If you do not have a little red arrow just make sure the openings in your pegs are pointing down.
- First layout the bands as shown. All band are double bands (2 bands) unless otherwise stated (e.g. 3bs means 3 bands). The green numbers show what order to lay the bands, starting at 1 and working up.
- The cap band on the bottom peg goes on last and needs to be wrapped around the peg 3 times.
- Now loop following the red arrows in the order of the black numbers (you know you have looped the correct bands when you see the tear drop shape).
- Remove the arm from the loom, placing a cocktail stick/spare hook through the top two loops to keep them secure and set aside.
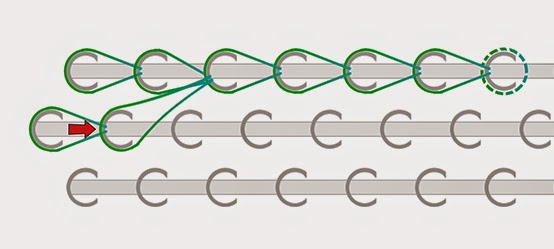
This is what is should look like when looped.

Feet

- Layout the bands as shown following the green numbers (double bands unless otherwise stated).
- The cap band goes on last and needs to be wrapped around the peg 3 times.
- Loop following the red arrows and the black numbering.
- Remove from loom and leave to the side (you can use cocktail sticks to secure the open loops or just be very careful not to pull them out.
Main Body Layout
Be careful if you are looking at the original video, this is where the design starts to differ in places.
 |
| click to enlarge |
You will need 77 body coloured bands for this part of the layout.
- Place the bands on the loom in the order indicated by the green numbers in the diagram (all double bands unless otherwise stated).
- Place the feet on the last pegs to act as cap bands.
The design differs from the video design in that:
- there is no neck,
- the legs are longer
- the legs are all 3 bands
Eyes

You need 1 body coloured band, 2 iris coloured bands and 4 'whites' coloured bands (I used red and black).
These are a little fiddly because you have to twist each band onto the hook three times to make four loops one after another, so they are all on the hook at the same time in the order shown.
Then you put the body coloured band on the end of your hook, stretch it, and work all the twisted bands onto it so you get the diagram above.
 |
| click to enlarge |
- Take one end of the body coloured band and put to on the right peg shown.
- Take the other end of the body coloured band and put it on the left peg.
- Push two black and one red band to the right and two black and one red band to the left.
- Use your hook to catch one strand of the band between the two eyes.
- Hook this over the central peg so that it keeps the two eyes separate.
Tentacles
The tentacles are a set of simple chains. To make a chain you use the following technique:
 |
| click to enlarge |
 |
| click to enlarge |
- Once you have made the 6 chains, slip them all onto your hook.
- Put one band on the end of your hook and stretch it.
- Slide all your chains onto the single band similar to the diagram (only you'll have 6 not 3).
 |
| click to enlarge |
- Take one end of the single band and push it onto the right peg shown.
- Take the other end of the single band and push it onto the left peg shown.
Placing the Arms

- Slide one arm off its holding stick.
- Take hold of each end of one of the double free loops.
- Push one end on the shoulder peg and one end on the next peg down.
- Take hold of each end of the other double free loops.
- Push one end on the shoulder peg and one end on the next peg down.
- Repeat on the other side of the loom.
Horizontal Body Bands
 |
| click to enlarge |
- Place one single band in a triangle over the first three pegs after the shoulders (i.e. the outside pegs are the bottom of the arms).
- Take one band and double it as follows:
twist into a figure 8
fold in half
hold both loops and stretch over the next three pegs - Repeat step 2 and place the band over the next three pegs as shown.
This will give you a wider chest going to abs.
Your loom should end up looking like this:
Your loom should end up looking like this:
 |
| click to enlarge |
Looping
Loop the Legs
 |
| click to enlarge |
Loop the Torso
 |
| click to enlarge |
- When you get to the pegs where the arms are, make sure you are collecting only the bottom bands for looping. These will be the underlying bands that you placed first.
- Make sure you loop to the central peg for 10, 11 and 12 in the right order.
Loop the Head
 |
| click to enlarge |
- The middle peg is the hardest because it has so many bands on it. DO NOT pick up any of the bands looped to it when looping the head bands.
- Make sure you loop the chin in the correct order - start with the top two of the bands you need to loop - these should loop to the left (check for the tear drop shape).
- Then pick up the next 2 and loop them to the right.
- Finally loop the centre bands up - BUT - DO NOT loop over the tentacles. When you have looped 1 and 2 carefully lift the tentacles over the peg below (i.e. the neck peg), then loop band 3, then put the tentacles back.
- Continue to loop following the arrows and the numbers - MAKE SURE to loop the centre top bands last because this gives him a nice brow ridge.
Take off the Loom
To prevent it all falling apart when you remove it from the loom you need a securing band.
- Push your hook through the space in the top peg so you can see it beneath all the bands on the peg.
- Take one single band and use your hook to pull it up through all the bands on the peg.
- Put both ends of the band on the hook.
- Pull the end closest to your hand over the other end of the band and off the hook.
- Slide the remaining end from the hook onto your finger and pull tight (you should have a single slip knot).
- With the loop still on your finger remove Cthulhu from the loom.
- Make sure the securing band is pulled as tight as you can without breaking it and then use your hook to hide it under some of the other bands in the project.
Wings
If you do not have two looms you can link together, just leave out one of the two middle rows. His wings won't be as wide, but don't worry.
 |
| click to enlarge |
Layout double bands as shown in the diagram following the numbering scheme. (As long as you lay the horizontal band on the top middle pegs first and the diagonal bands on the top outside pegs after that it doesn't matter which column of bands you lay in which order only that you start from the top and work down).
 |
| click to enlarge |
Add a single cap band to each column, twisted only once to form two loops.
 |
| click to enlarge |
Simply start from the bottom and loop up each column. I've numbered them in the diagram, but you can loop them in any order.
The only three that really need to be looped in a specific order other than bottom up, are 16, 17 and 18.
Once it is looped put a securing band through the bands on the last peg to which you looped as you did with the main body and remove the wing from the loom.
Make a second wing.
Attaching the Wings to the Body
 |
| Sorry for the awful drawing in this one ;) |
First of all attach a second securing band somewhere on the same edge of each wing as the original securing band. See my terrible drawing as an illustration.
You do this by sticking your hook through an available loop, drawing a single band through then looping one end of it over the other and pulling tight.
- Push your hook from the front through Cthulhu at about shoulder level to right or left of the body.
- Hook the top securing band on one wing and pull it back through the body.
- Push your hook through the body just below where you did before, from the back this time.
- Pull the band back through.
- Loop the free end of the band over the wing which will secure it.
- Repeat all steps for the second securing band a little further down the body.
- Do the same for the second wing so it matches the first on the other side of the back.
Ta da - you should now have a Cthulhu :). All hail the elder gods.
Great job!
ReplyDeleteI don't have the patience or skill for something like that, but it looks cool.
Thank you :) It's a lot of fun.
DeleteI am so thankful for your tutorial! I do not think I would ever manage to create such a pattern myself, and you made a very beautiful one and it was really easy to follow. Thank you again for this beautiful “Elder God”.
ReplyDelete